20 Steps To A Pond With Planters

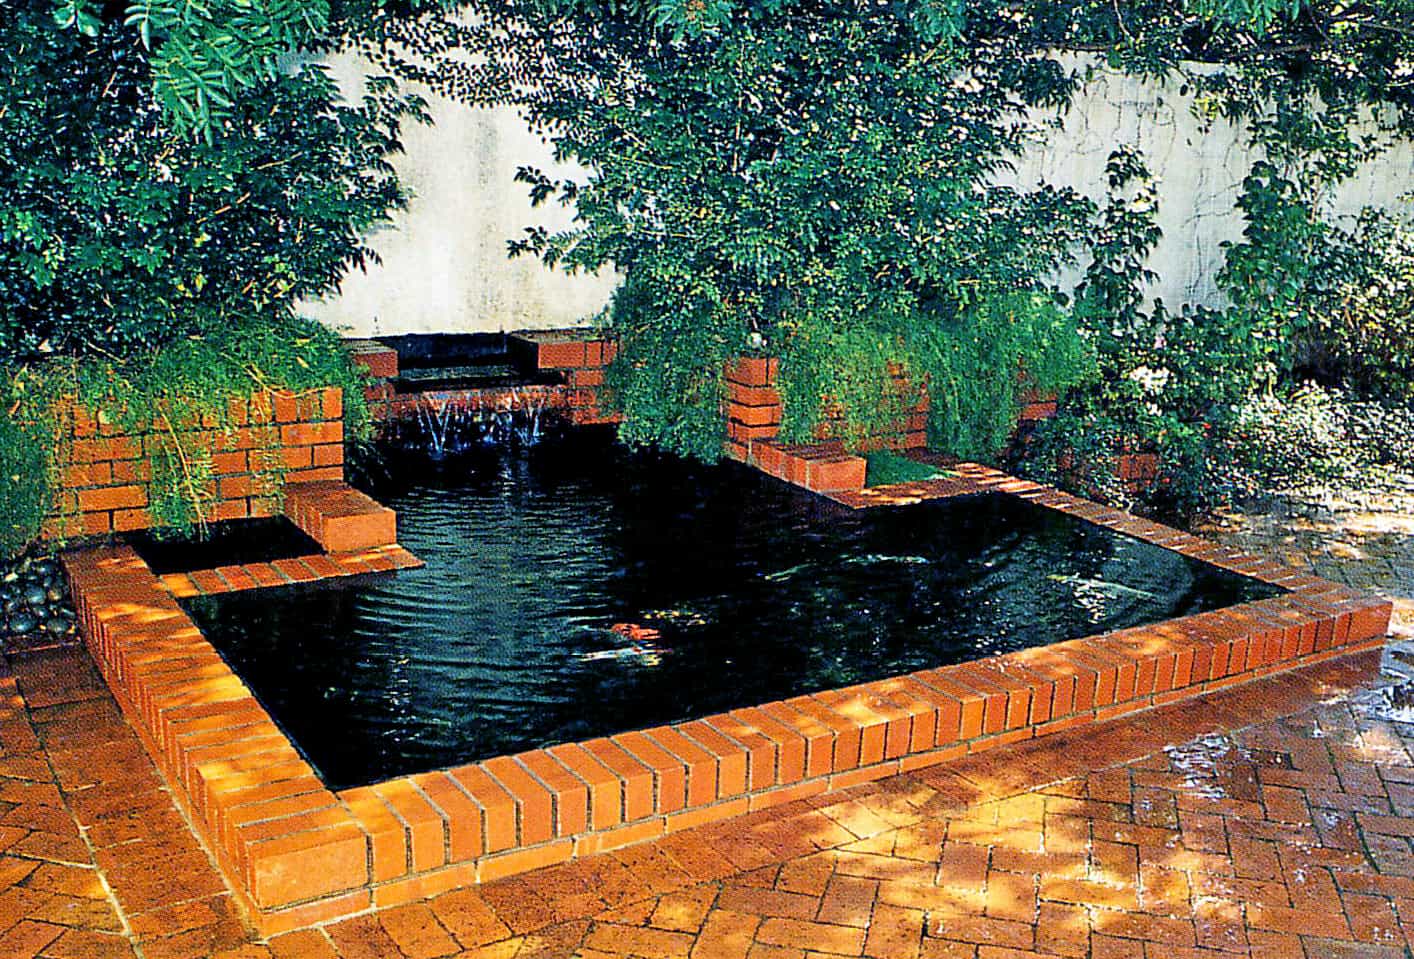
Imaginative design and creative thinking will enable you to build this pond with planters which incorporates two planters and a fountain feature. This enchanting formal koi pond combines the benefits of a reflective water surface with the sight and sound of water. The ingenious fountain spillway was custom-made from glass. The design includes four planters, one of which accommodates a submersible pump. A biological filter is housed above the height of the fountain, behind the back wall, to allow the water to flow out automatically, with gravity. The front section of the pond is deeper than the back section to provide for the needs of the exotic koi. Quantities given presume you are building against an existing wall. If not, you will need more bricks, cement, sand and stone.
Here are a few searches that might have gotten you here:
• how to shape a pond
• design garden pond
• how to build a fish pond above ground
• concrete block pond waterproofing
• build a pond with retaining wall blocks
• how to build a koi pond with concrete blocks

Materials
For a pond with measurements as shown in the illustration:
862 face bricks
850 kg (1 875 lb) cement
1.45 m’ (1.9 cu yd) sand
0.6 m’ (0.7 cu yd) stone
waterproofing additive (optional)
15 L (¾ gal) rubberized bitumen sealer (depending on brand)
3 m x 40 mm (10 ft x 1½ in) semi-rigid tubing
2 elbow connectors
1 x submersible pump, with 0.5 m (1.6 ft) water head (pumps 70 L or 15 gal per minute)
1 x biological filter
1 x 350mm x 700mm x 10mm (1 ft 2 in x2ft 4 in x ¾ in) sheet fiber cement (or similar material)
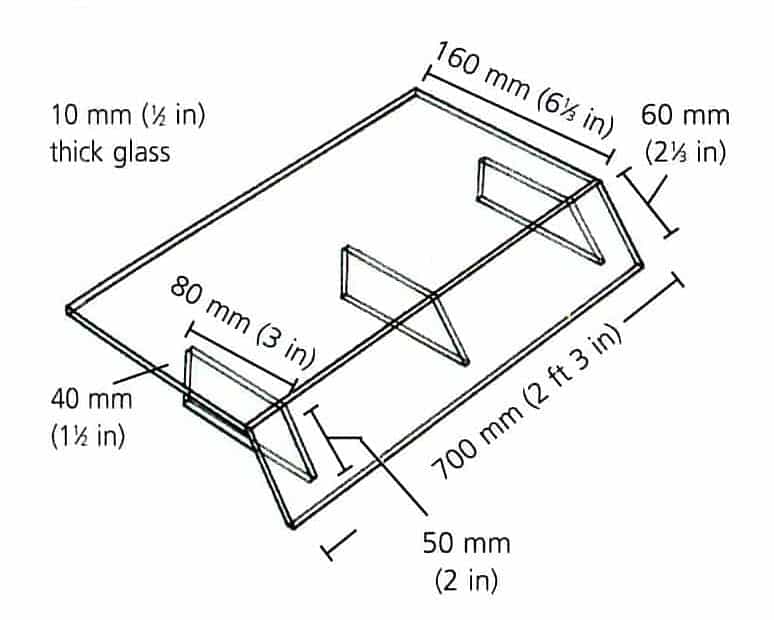
1 x 700mm x 160mm x 10mm (27 ½ in x 6 ¼ in x ½ in) glass or perspex
1 x 700mm x 60mm x 10mm (27 ½ in x 2 ¼ in x ½ in) glass or perspex
3 x 80mm x 40mm x 10mm (¾ in x 1 ½ in x ½ in) glass or perspex, with one end splayed to 50 mm (2 in)
silicone sealer
These are some of the items that you could need for this project:
Tape measure
Cement
Pond pumps
Brick Jointer
Preparation
Step 1 – Peg Out Pond
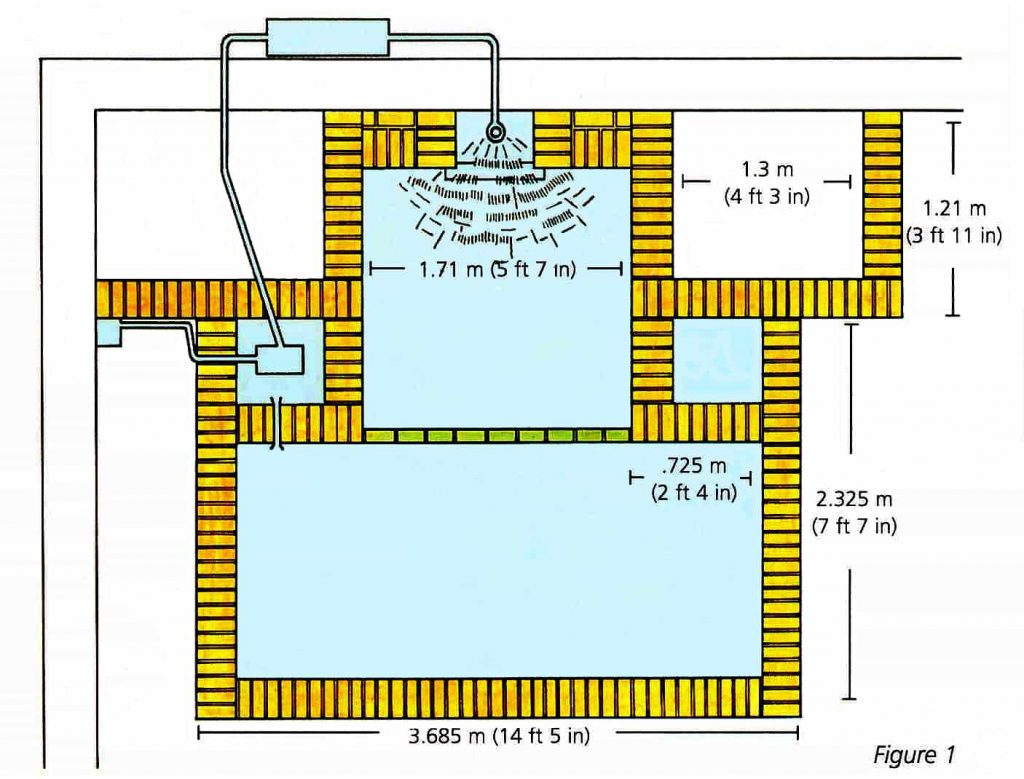
Peg out the pond with planters according to the dimensions shown in figure 1 (above), but allowing an additional 100 mm (4 in) on all sides for the foundations. Then excavate to a depth of about 350 mm (1 ft 2 in). You will have to dig out an additional 650 mm (2 ft 2 in) of soil from the front rectangle which is deeper.
Concrete
Step 2 – Mix Concrete
You will need 8 bags of cement for the concrete, which should be mixed in the ratio 1:2:2 (cement:sand:stone), with a waterproofing additive if you wish.
Throw a strip foundation for the walls of the planters, and for a dividing wall between the two sections of the pond (see area indicated by green blocks in figure 1 above). Note that the dividing wall extends from the base of the lower pond to the base of the upper one.
Step 3 – Build Dividing Wall
You should throw slab foundations for both ponds and the small planter which will contain the pump. First build the dividing wall as described in “Best Pond Building Methods”. Allow time for the mortar to set and then fill any remaining gaps behind the wall with soil and compact well.
Step 4 – Level Concrete
Now you can throw the slab foundations using a straightedge to level and compact the concrete. Use a spirit level to check your surface, then allow the foundations to set for at least 24 hours. Note that there is no concrete on the base of the three additional planters.
Brickwork
Step 5 – Check Brick Layout
Since this is a fairly complex pond with planters design, it really will help to lay out the first course of bricks without mortar before you start laying. You will need about 300 kg (660 lb) cement for the mortar which should be mixed in the ratio 1:3 (cement:sand).
Step 6 – Use A Level When Laying Bricks
Lay the bricks in the usual way (See “Best Pond Building Methods”), in stretcher bond, remembering to use the correct leveling tools. The procedure is the same as that followed for the previous project, but there are more corners and so additional checking will be necessary to ensure that the structure is properly built. The front section of the pond comprises brick walls which are eight courses high (excluding the coping), with only a single course above ground. The back planters are nine courses high, with six extending above ground level, while the two small planters are only four courses high. Leave a couple of un-mortared gaps in the wall between the main pool and pump compartment for the free flow of water. Also leave a small gap to accommodate the pipework which leads to the filter.
If you do not have one you must get yourself a trowel:
Step 7 – Header Bricks On Edge
Lay the bricks on edge as a header course so forming a coping on top of the walls. Note that this particular design incorporates a double course of coping bricks on the inner wall of the small planters (see figure 1).
Step 8 – Rake Out And Let Dry
Rake out the joints and allow the mortar to set.
Fountain
Step 9 – Lay The Bricks
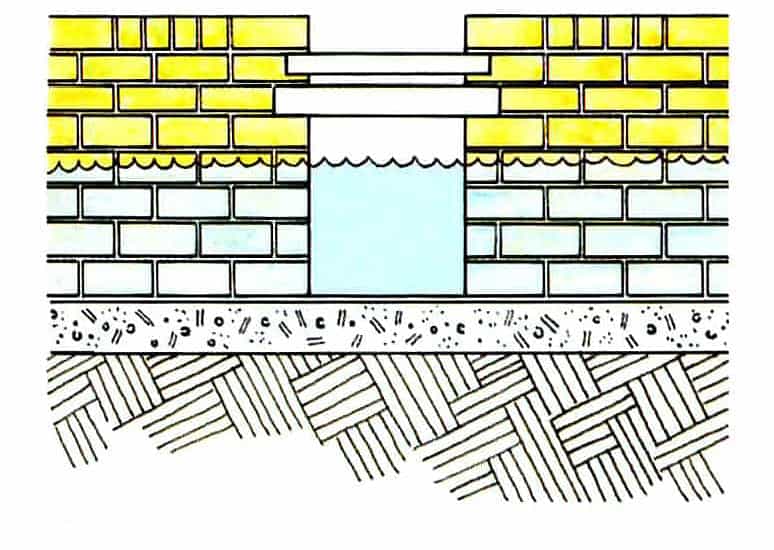
Lay the bricks for the fountain feature according to figure 2 below. Two piers, approximately 650 mm (1 ft 2 in) apart and measuring 540 mm x 340 mm (1 ft 9 in x 1 ft 2 in) are built up seven courses in stretcher bond with the top coping after Step 11 (see below).

Step 10 – Create A Wier
Place the sheet of fiber cement over the gap between the two piers and build up a further two courses, with a half-brick course spanning the opening to create a weir. The height of the finished fountain construction is slightly lower than the surrounding planter walls.
Step 11 – Glue/Silicone Spillway
Make up the fountain spillway by gluing the five sheets of glass or perspex together with a clear silicone sealer (see figure 3 below). When the structure is thoroughly dry, lay it across the front of the opening and then lay the coping as indicated in figure 1 above.

Pipework and Wiring
Step 12 – Holes For Pipework
Knock two holes in the wall behind the pond so that you can lead the pipework from the filter to the fountain and the pump. Push one end through the hole you previously left in the one small planter. Do not connect the pipe to the pump until the interior surface has been rendered and sealed with bitumen.
Step 13 – Drill Cable Hole
To enable you to lead the power cable unobtrusively from the pump, drill a hole in the side wall of the same small planter.
Plaster or Render
Step 14 – Render
The floor of the pond, including the planter which will house the pump, and the internal walls may now be rendered. Mix 150 kg (330 lb) cement with 0.3 m³ (10 cu feet) of sand and add sufficient water to make the mixture pliable. Include a waterproofing additive and plasticizer in the mix if you wish.
It is important to use a good quality cement:
Step 15 – Work In Sections
Working from the back wall, lay on the plaster or render with a plasterer’s trowel, applying pressure to make it stick to the bricks. Work in sections, smoothing with a plasterer’s float once it has settled, and using corner trowels to neaten the corners. Note that the render here is about 20 mm (¾ in) thick.
Step 16 – Cement Pipework In
At the same time, render in the pipework where it enters and exits the various walls.
Sealing
Step 17 – Set For 24-48hrs
Allow the smoothed render to set for at least 24-48 hours before painting on a rubberized bitumen sealer or any other suitable sealant, according to the manufacturer’s instructions.
Here is a selection of sealers to choose from:
Pump and filter
Step 18 – Connect Pipes
The bitumen does not take long to dry, and then you can place the pump in its own compartment and connect it to the loose pipe. Connect the other end of the pipe to the filter, which should be positioned above the fountain spillway.
Step 19 – Connect Electrics
Remove the electric plug from the pump and take the power cable through the hole previously drilled. Replace the plug and connect it to an external socket in a waterproof box. Seal around the cable with silicone sealer. NOTE: If you are not experienced with connecting electrics then YOU MUST get an electrician to assist.
Finishing off
Step 20 – Fill With Water
When the sealant is completely dry, you can fill the pond with water and plant the additional structures. And there you go your pond with planters is complete. Well done!
You will need a good pump for this pond:


One Comment